Basic Information PageMaker
Introduction:-
Adobe PageMaker is powerful and versatile page layout software. Professionals use PageMaker for its exceptional typographic controls, exacting page design capabilities, including layers, frames, and multiple master pages, and numerous customizing options.
PageMaker’s extensive importing and linking capabilities let you incorporate text, graphics, spreadsheets, charts, and movie frames from most popular programs. It also incorporates menu plug-ins that extends the program’s features and capabilities. It also supports advanced color printing technologies, including high-fidelity inks, color management support, automatic trapping, built-in imposition tools, and complete separation capabilities for text and graphics.
Let us first understand the PageMaker Window with its various components. shows the important areas of the PageMaker window:
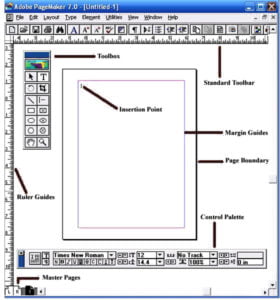
You use the menu bar to give PageMaker instructions on how to set up your publication and lay out your pages. The Menu Bar contains nine different options:
File – Use this menu to manipulate your files. You can create, open, close, save, export and import files with this option. The menu also contains command for printing.
Edit – This menu contains options for cutting and pasting text and graphics.
Layout – Using this menu, you can choose to insert and delete pages. This also has the option for inserting Column Guides.
Type – The options on this menu allow you to specify the size and alignment of your text. Almost everything related to text is on the Type menu, including fonts, sizes, alignment, type styles, spacing and indentations.
Element – This menu contains options that affect graphic elements, such as lines, rectangles, and ellipses/circle, as well as imported graphics images.
Utilities – This menu is the gateway to the PageMaker plug-ins. It also contains Story Editor commands (to perform searches, replacements and spell checks) and options for creating tables of contents and indices.
View – Use this menu to view the page at different levels of magnification. For example, you can see the entire page at once with one option, or you can zoom a section of a page to twice its actual size with another. This menu also contains items that can be turned on and off, such as rulers and grides.
Window – Use this menu to control what you see in your window. For example, you can turn on and off display of the toolbox, Colors palette, control palette, and a Style palette.
Help – Use this menu to display an index of different topics on which online information is available.
In many of these menus, there are options that are unavailable at the time of selection and are dimmed. If these menu items are selected, the program just ignores them. For example, the items like Find, Find Next, etc.
The Toolbox appears in the upper-left corner of the window, but can be moved to anywhere in the publication window. The PageMaker tools allow you to create or modify text and graphics on the page. To select a tool, just click on it. Of course, there are also keyboard shortcuts for each and every tool in the Toolbox.
Apart from these, there is also the Control Palette. In fact, there are many Palettes like Color Palette, Control Palette, Hyperlinks Palette, Master Pages Palette, Style Palette and Tools Palette. The Control Palette changes according to the tool selected in the toolbox.
Viewing the Page:
When you create a publication, PageMaker opens a publication window, which contains an empty page centered on the pasteboard. PageMaker lets you view your pages at several preset magnifications. The Fit to Window option under the View menu lets you see the entire page or page spread inside your publication window. This is the default view. It gives you an overall feel of the page layout. However, you cannot see much detail. The Actual Size option displays the elements on your page at their actual printed size. Use this option to read small type. To toggle between Fit in Window and Actual Size, press Shift and press the right mouse button. When precision is imperative, you can select Zoom To select a larger value. To find or view objects on the pasteboard, use Entire Pasteboard. To move to the next greater or lesser preset view of a page, choose View > Zoom In or View > Zoom Out.
The Zoom Tool lets you magnify or reduce the display of any area in your publication. To toggle between magnification and reduction, press the Ctrl key. Thus when Ctrl key is pressed, the Zoom tool results in reduction, otherwise it gives magnification. When the publication has reached the maximum magnification or reduction level, the center of the magnifying glass appears blank. On selecting the Zoom tool, place it at the centre of the area you want to magnify or reduce, and then click to zoom in or out. You can also double click the tool to jump to Actual Size, or Alt as you double click the tool to Fit the Window view.
To magnify a part of the page, you can drag the magnifying glass after selecting the Zoom tool. Drag to draw a marquee around the area you want to magnify. You can also zoom to magnify or reduce, even when you are using a different tool. To magnify, press Ctrl + Spacebar as you click the mouse, and to reduce, press Ctrl + Alt + Spacebar as you click.
Scrolling Within a Window:
You can use the scroll bars along the bottom and right sides of the active window to control what displays in the publication window. You can show or hide the scroll bars at any time. In addition, PageMaker lets you reposition the page quickly by dragging the mouse.
To display or hide the scroll bars, choose View > Show/Hide Scroll Bars. If the scroll bars are already visible then you would get the option Hide Scroll Bars, and if they are not currently displayed, the option available would be Show Scroll Bars.
To reposition the page by dragging, you can either have the Alt key pressed as you drag with the mouse, or alternatively, select the Hand tool in the toolbox.
Working with Palettes:
As already mentioned, PageMaker comes with several palettes. The following techniques can help you save time when you are working with palettes.
Choose the appropriate Show or Hide command from the Window menu to control the display of the palettes or group of palettes. Use the Window > Plug-in Palettes command to show or hide palettes for installed plug-ins. You can open or close most palettes using the keyboard shortcuts. You can also show or hide all palettes by pressing the Tap key (make sure that the insertion point is not selected in your text).
To hide all palettes except for the Tools Palette, press Shift + Tab. Pressing the Tab key without the Shift will hide also the Tool Palette. To rearrange, separate, or reorganize palettes, drag the palette’s tab. You can create a separate palette outside of an existing group to create a separate palette or drag it over an existing group to add the palette to that group. However, note that the Control Palette, Library Palette, Scripts Palette and Tools Palette cannot be grouped with other palettes. By default, the Colors and Style Palettes are grouped together so that they appear as panels within a larger palette; the Layers and Master Pages Palette are also grouped together in this way. To make a particular tab (say Colors) at the front of the group, click the palette’s tab. To display the palettes menu commands, click the triangle in the upper right corner of the palette (For more details click here working with palates.
Creating and Opening Publications:
Once you start PageMaker, you can either create a new publication from scratch, or open an existing PageMaker Publication, or you can begin a new publication based on an existing design by opening a template.
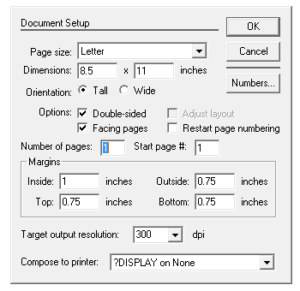
When you are creating a publication from scratch, you make basic design decisions in the Document Setup dialog box, which opens automatically when you choose > New. You specify page layout details – number of text columns, paper size, orientation, page numbering scheme, and the basic design of the publication. When under Option, Double sided is selected, side margins are labeled Inside and Outside. Otherwise, side margins become Left and Right. If you know how many pages the publication will have, you can create them at this point by filling up the appropriate number in Number of Pages. If you do not know, you can easily add or remove pages later. Select the option Adjust Layout when you change the page settings of an existing layout and want PageMaker to automatically move and scale text and graphic objects. If the current publication is a part of a larger book (a linked set of publications), and not numbered sequentially, then select the option Restart Page Numbering. You also have to specify the printer that you will use to print the final version of your publication under Compose to Printer, and select the dots per inch (dpi) of your final output device under Target Printer Resolution
To open an existing PageMaker publication, use the File > Open command to open the original version or a copy of a PageMaker publication or template. When you select this command, a dialog box appears (similar to File Open Dialog box of Word) with options of opening it as Original or Copy. PageMaker also keeps track of the eight last publications you opened and saved and lists these when you choose File > Recent Publications.
You should give careful thought to your page setup when you are creating a publication. Before you add any text or graphics to the page, make the following important decisions:
- Paper size of the final document.
- Margin settings.
- Whether you want the page orientation to be tall or wide (PageMaker does not use the terms like Landscape and Portrait).
- Whether the final document will be double-or single-sided.
- How many columns your publication will have.
PageMaker provides you a choice of 14 industry-standard page sizes: Letter, Legal, Tabloid, A3, A4, A5, B5, Magazine Narrow, and Magazine Wide, Magazine Broad, Compact Disk. Letter half, and Legal half. Furthermore, by choosing Custom, you can create a page of any size. By using PageMaker’s Printer Marks (a fancy name for crop marks), you can tell your print shop exactly where to cut the paper to achieve the desired size.
